Difference between revisions of "Tips and Tricks"
(→STATIC) |
|||
| Line 383: | Line 383: | ||
=== Using the nmcli command directly === | === Using the nmcli command directly === | ||
| − | + | ||
To change the IP address of the "enp1s0" interface with a direct nmcli command, we run: | To change the IP address of the "enp1s0" interface with a direct nmcli command, we run: | ||
| − | $ sudo nmcli connection modify enp1s0 IPv4.address 192.168.122.66/24 | + | $ sudo nmcli connection modify enp1s0 IPv4.address 192.168.122.66/24 |
| − | + | ||
| − | {{red| Notice that we specified the routing prefix together with the IP using the so called CIDR notation | + | {{red| Notice that we specified the routing prefix together with the IP using the so called CIDR notation. We use a similar syntax to change the gateway and the dns settings:}} |
| − | + | ||
| − | $ sudo nmcli connection modify enp1s0 IPv4.gateway 10.16.xxx.254 | + | $ sudo nmcli connection modify enp1s0 IPv4.gateway 10.16.xxx.254 |
| − | $ sudo nmcli connection modify enp1s0 IPv4.dns 10.16.1.115 | + | $ sudo nmcli connection modify enp1s0 IPv4.dns 10.16.1.115 |
| − | $ sudo nmcli connection modify enp1s0 IPv4.dns 10.16.1.118 | + | $ sudo nmcli connection modify enp1s0 IPv4.dns 10.16.1.118 |
| − | $ sudo nmcli connection modify enp1s0 IPv4.method manual | + | $ sudo nmcli connection modify enp1s0 IPv4.method manual |
| − | |||
== {{title|Solaris}} == | == {{title|Solaris}} == | ||
Revision as of 11:56, 25 June 2020
Windows
Greek Spell Checking for the Mozilla and Mozilla Thunderbird email clients
In order to have Greek spell checking for the previously mentioned clients ( Mozzila mail, and Mozzila Thunderbird Mail) go to ftp://ftp.cs.ucy.ac.cy/pub/Windows/Thunderbird/Greek_Dictionary/ and download the el.aff and el.dic
Save the downloaded files in the following locations:
- For Mozilla mail in C:\Program Files\mozilla.org\Mozilla\components\myspell
- For Thunderbird in C:\Program Files\Mozilla Thunderbird\components\myspell
--- nsc
Start/stop Windows services remotely
Use the command sc to enable and start the service: --- Tmaria
sc \\hostname config <servicename> start= auto
sc \\hostname start <servicename>
Use the command sc to disable and stop the service:
sc \\hostname config <servicename> start= disabled
sc \\hostname stop <servicename>
To initiate immediate contact between a client computer and WSUS server
On the client computer, at the command prompt, type
wuauclt.exe /detectnow This will force the client computer to initiate contact to WSUS, and appear in WSUS console
To remove Software Restriction Group policies settings on windows XP pcs
When users can not logon when wrong Software Restriction group policies have been set-up on DC you can follow the next steps to solve the problem: Reboot the pc in safe mode Run regedit and delete the subkeys of HKLM\Software\Policies\Microsoft\Windows\Safer
How to move folders and files on WindowsXP/2000/2003 and retain security permissions (useful when moving profiles dirs)
Use robocopy command from windows 2003 Resource Kit Tools. The syntax is : robocopy <source> <destination> /e /move /copyall Check [1] for all command options
How to install network printer for all users on windows machines
Execute the command from a windows server. Using the above command, will also install the network printer for all users. Use the tool \\kalliopi\sys-data\Windows\Tools\addglobalprinterremotely.cmd. The syntax of the command is: addglobalprinterremotely.cmd <remotemachinename> <printservername>\<printersharename>
How to reset owners on folders and subfolders on Windows XP
Execute the command
subinacl.exe /subdirectories <directoryname>/* /setowner=<username>
Trying to delete computer object from AD your prompted that the object is a container
Most objects in AD can be containers for other objects. They don't have to be an OU to be a container. It could possibly be a container for other objects such as printers. To check this, in ADUC turn on View->Users,Groups, and Computers as Containers. Now click on the computer, and in the right plane you'll see what objects it contains. If it printers, you can most likely move it or delete it.
Windows Messenger won't start
While trying to start up Windows Messenger, the mouse cursor shows an hour glass for a few seconds and then nothing. Windows Messenger doesn't come up and no error message is shown.
Uninstall, Re-install.... makes no difference.
And the Windows XP event viewer displays the following error:
The description for Event ID ( 4 ) in Source ( (MSN/Windows) Messenger Service ) cannot be found. The local computer may not have the necessary registry information or message DLL files to display messages from a remote computer. You may be able to use the /AUXSOURCE= flag to retrieve this description; see Help and Support for details. The following information is part of the event.
Solution:
Using the registry editor, follow this path:
HKEY_LOCAL_MACHINE\SOFTWARE\Policies\Microsoft\Messenger\Client
There you should see a key called PreventRun with a value set to 1. Change the value to 0.
Try Windows Messenger again. Should work fine now.
How to remove Windows Desktop Search
Execute the command c:\windows\$NtUninstallKB917013$\spuninst\spuninst.exe /q /norestart
You can run it through GP, using scripts for users or computers, or you can use the at command
How to re-initialize the offline files cache and database
The Offline Files cache is a folder structure located in the %SystemRoot%\CSC folder, which is hidden by default. The CSC folder, and any files and subfolders it contains, should not be modified directly; doing so can result in data loss and a complete breakdown of Offline Files functionality.
If you suspect corruption in the database, then the files should be deleted using the Offline Files viewer. After the files are deleted out of the Offline Files viewer, a synchronization of files may then be forced using Synchronization Manager. If the cache still does not appear to function correctly, an Offline Files reset can be performed using the following procedure:
  1. In Folder Options, on the Offline Files tab, press CTRL+SHIFT, and then click Delete Files. The following message appears:
     The Offline Files cache on the local computer will be re-initialized. Any changes that have not been synchronized with computers on the network will be lost. Any files or folders made available offline will no longer be available offline. A computer restart is required.
     Do you wish to re-initialize the cache?
  2. Click Yes two times to restart the computer.
How to save a mapped drive password in XP
Use the following if the gui can not save the network password The manage network passwords utility in XP doesnt have an add password function so you have to go to the command prompt and use the following :
NET USE U: \\NETHOME\USERID /PERSISTENT:YES /SAVECRED
This will prompt you for the Username and password and store them.
WINDOWS 7
Boot manager installed windows 7 twice how to delete one?
The easiest way to remove an entry in the Windows 7 Boot Configuration is to use msconfig.
To launch msconfig:
1. Click Start
2. In the Search text box, type msconfig
3. Launch msconfig by selecting it from the search results above the search text box.
After msconfig is launched:
1. Go to the Boot tab
2. Slect the boot entry you want to delete.
3. Click the Delete button and then click OK.
Make sure to be logged in to the Windows 7 partition you want to keep when performing these steps so you don't delete the good installation by mistake.
AIX
How to start the Xserver
startsrc -s dtsrc
How to solve 0516-787 extendlv: Maximum allocation for logical volume Name is Value Possible Causes
Using the System Management Interface Tool (SMIT), you specified a value in the Number of ADDITIONAL logical partitions field to try to increase the logical volume size beyond the maximum number of logical partitions.
Procedures for Recovery
Use SMIT to change the logical volume.
Use the SMIT Physical and Logical Storage--> Logical Volume Manager--> Logical Volumes--> Set Characteristic of a Logical Volume--> Change a Logical Volume menu option to specify a new number of logical partitions in the MAXIMUM NUMBER of LOGICAL PARTITIONS field.
How to solve 0782-626 Opening the ODM class "sm_cmd_hdr" failed (odmerrno is 5910). Use local problem reporting procedures.
cd /var/spool/lpd/pio/@local/smit
ls -la # are file lengths 0 ???
If they are then:
cp /usr/lib/objrepos/sm* /var/spool/lpd/pio/@local/smit
and then:
ls -la # the file lengths should be normal
Linux
mount -t smbfs -o username=<YOUR_USERNAME>,workgroup=CS-UCY-AC-CY //<WINDOWS_MACHINE_NAME>/SHARED_FOLDER /PATH/TO/YOUR/MOUNTPOINT
Reclaiming free space after deleting log files
If a filesystem is full (for example /var) and you delete some log files in order to make some room on the filesystem, you observe that the space does not appear to be there when running the
df command.
The solution to this is to restart the application which is using the log files deleted. e.g: if you delete an apache log file then you should restart the httpd service.
% service httpd restart will do the trick nsc
Typing Greek in Linux Fedora Core 4 (changing the keyboard maping to greek 319)
Note that for FC6 this is no longer necessary. The language and keyboard setup can be changed from the System/Preferences/Keybord tool.
First of all download this file from the UCY CS Dept. ftp server [2] ... This file contains some files...We are interested on the two of them: el319 and en319! You have to put them in the following folder(be sure you are logged in as a superuser). So lets start : Extract the contents of the package in a folder
tar -xvf gr319kb.tar.bz2
and copy those two files in the /etc/X11/xkb/symbols/pc/ folder... you can run the following commands from that folder:
cp el319 /etc/X11/xkb/symbols/pc/el319
cp en319 /etc/X11/xkb/symbols/pc/en319
(After that if you want to load those key-maps you can type :setkeymap el319 (or en 319) in order to have the mapping you need...(NOT RECOMENDED))
If you want to have the mapping loaded in the system by default and switch between mappings with alt-shift you have to make some changes to the file /etc/X11/xorg.conf . So , open that file with an editor and find the line that describes the keyboard mapping configuration...That should be under the Section "InputDevice". After all those comments we have to change(or/and add) some lines and make them look like this:
...
Section "InputDevice"
...
Identifier "Keyboard0"
Driver "kbd"
Option "XkbModel" "pc104"
Option "XkbLayout" "en319,el319"
Option "XkbOptions" "grp:alt_shift_toggle,grp_led:scroll"
EndSection
...
change everything that needs to be changed in those lines and save the file...
Restart the X server(or the computer) and the new configuration will be loaded. From that time you can change the keyboard layout by pressing alt-shift(just like windows!).
NOTE:After the restart you will be asked to use: gnome or X configuration...Be sure you choose the X configuration!
Variable Indirection in csh scripting
Although the csh (and therefore? tcsh) are considered not to support variable indirection as bash does with the use of the (!) exclamation mark, the following command does the trick nsc set temp=`eval echo \$${x}`
 bash example
$a=x
$x="Hello There"
$echo $a
x
$echo $!x
Hello There
$
 tcsh example
%set a=x
%set x="Hello There"
%echo $a
x
%eval echo \$$x
Hello There
%set tmp=`eval echo \$$x`
%echo $tmp
Hello There
Seting extented permissions for OPNET directories
The following commands must be used in order to give rwx permissions to Mylonas for the opnet directories
  /usr/bin/setfacl -d --set u:<USERNAME>:rwx,m:rwx /path/to/<USERNAME>
  /usr/bin/setfacl -m u:mylonasy:rwx /path/to/<USERNAME>
  /usr/bin/setfacl -d -m u:mylonasy:rwx,m:rwx /path/to/<USERNAME>
How to allow XDMCP run on linux server
In order to allow other clients to connect to a linux machine, by X-win, the following steps should be followed:
- 1. /etc/X11/xdm/Xaccess file: uncomment the line that allows all host to get a login window.
- 2. /etc/X11/xdm/xdm-config file: comment out (with !) the last line which contains DisplayManager.RequestPort:0
- 3. Enable [XDMCP] service from /etc/X11/gdm/gdm.conf (/etc/gdm/custom.conf for FC5 kekkos) and /etc/kde/kdm/kdmrc files. The required changes in the custom.conf file are:
 [daemon]
 RemoteGreeter=/usr/libexec/gdmgreeter

 [xdmcp]
 Enable=true
If you are too lazy to edit the file then go to System->Administration->Login Screen->Remote-> and set Style to "Same as local"
- 5. Reboot the machine
How to rip (create) an ISO image from a normal CD
In order to create an ISO image from a any normal CD go to any Linux machine and do:
dd if=/dev/cdrom of=<my_cd_image.iso>
where <my_cd_image.iso> is the ISO file name you are creating.
This assumes that your cd drive is called /dev/cdrom
To test that you have actually created an ISO image do:
mount -t iso9660 -o ro,loop <my_cd_image.iso> /mnt/cdrom
cd /mnt/cdrom
List the files in the ISO image. You should get a listing of the CD files in the ISO image.
Starting Condor on the linux rack servers
All machines that are currently running condor are upgraded to the latest stable condor version ($CondorVersion: 7.4.3 Aug 4 2010 BuildID: 261829 $ ) Machine 1419 which is the master is not upgraded yet. The new condor starts/stops as a service using the command(s): service condor start / stop etc Also the configuration file for the new condor is under /etc/condor and the condor.sh and condor.csh in /etc/profile.d must change in order to reflect this. nsc 09:00, 28 February 2011 (UTC)
For the condor to run correctly one must start it first on cs1419
to start condor type: /usr/local/condor/sbin/condor_master
on some machines the executable is under /usr/local/condor/
Check that condor is running on cs1419 condor_status and then
start it on the rest of the machines using the same command
The list of the machines follows:
cs918, cs919, cs920, cs921, cs922, cs1417, cs1418, cs1419,
areti, ikaros, cs975, cs976, cs977, cs978, cs979, cs980, cs981, cs982, cs983, cs984, cs985, cs986, cs987,
cs988, cs989,cs990, cs991, cs992, cs993, cs1004 and cs1005
Use the condor_machines file, on the cluster ssh, to start them all at once
How to change condor configuration on cs1419
On cs1419 execute the following:
- su - condor
- make the changes on ~/condor_config file
- execute the command /usr/local/condor/sbin/condor_reconfig
Usefull condor commands
- condor_status : shows the status of the condor pool. which machines are idle, claimed etc
- condor_q : shows the status of submit jobs on a certain host. (idle, running, etc)
- condor_q -global : shows the status of submit jobs on all hosts
- condor_restart :restarts the condor pool
- condor_reconfig : forces the daemons to read the configuration file and reconfig
- /usr/local/condor/sbin/condor_off, condor_on : turns on/off the condor daemons
Condor Logs files
Logs files are under the same dir (for both master and client nodes) :
- /usr/local/condor/home/log
If condor does not start on client node then.....
- Check the /usr/local/condor/home/log/MasterLog file
- If you get something like "Failed to bind to command ReliSock (Make sure your IP address is correct in /etc/hosts.)ERROR BindAnyCommandPort failed" at line 6008 in file daemon_core.C" then
- Ensure that the machine is registered in ~condor/condor_config at HOSTALLOW_WRITE section
- Check the IP address of client node and check on /usr/local/condor/home/condor_config.local the NETWORK_INTERFACE value. This should be the same as the IP address.
Setup condor to start on BOOT
cp -p /usr/condor/etc/examples/condor.boot /etc/rc.d/init.d/condor
ln -s /etc/rc.d/init.d/condor /etc/rc.d/rc3.d/S95condor
ln -s /etc/rc.d/init.d/condor /etc/rc.d/rc5.d/S95condor
ln -s /etc/rc.d/init.d/condor /etc/rc.d/rc0.d/K04condor
ln -s /etc/rc.d/init.d/condor /etc/rc.d/rc6.d/K04condor
NOTE 1: Make sure that the path for the executable condor_master is correct in /etc/rc.d/init.d/condor and that the LOCAL DIR is also correct in ~condor/condor_config file
NOTE 2: If condor complains that it cannot find the config file when started as a service make sure you define the CONDOR_CONFIG variable in /etc/rc.d/init.d/condor before the MASTER variable definition
OpenOffice.org 2 and NFS
There is a problem with OpenOffice.org 2 when writing on NFS mounted points that causes the program to freeze. This can be solve by editing the file /usr/lib/openoffice.org2.0/program/soffice and commenting out the lines:
# file locking now enabled by default
#SAL_ENABLE_FILE_LOCKING=1
#export SAL_ENABLE_FILE_LOCKING
How to find NFS version and get server and client activity
Use the command nfsstat -m Prints information about each of the mounted NFS file systems If you execute the command on server, displays statistics kept about NFS client and server activity.
How to install ATI ES1000 drivers on fedora
Install the package xorg-x11-drv-ati using the yum command
How to re-run inittab, without rebooting the machine
Execute the command telinit q
How to set-up proxy server from the command line
export proxy_server=<servername>:<port#>
How to enable network using CentOS minimal package
DHCP
edit /etc/sysconfig/network-scripts/ifcfg-eth<> and add the following:
BOOTPROTO="dhcp" (only if you are using dhcp)
ONBOOT="yes"
DHCP_HOSTNAME="<hostname>"
STATIC
edit /etc/sysconfig/network-scripts/ifcfg-eth<> and add the following:
ONBOOT="yes"
BOOTPROTO="static"
IPADDR="x.x.x.x"
NETMASK="x.x.x.x"
BROADCAST="x.x.x.x"
NETWORK="x.x.x.x"
edit /etc/sysconfig/network
NETWORKING=yes
HOSTNAME=yourhostname
GATEWAY=x.x.x.x
Centos 8
Using nmcli shell
$ sudo nmcli connection edit enp1s0 --> Where enp1s0 is the interface name you got from the result of the command ip addr
===| nmcli interactive connection editor |===

Editing existing '802-3-ethernet' connection: 'enp1s0'

Type 'help' or '?' for available commands.
Type 'print' to show all the connection properties.
Type 'describe [.]' for detailed property descrIPtion.

You may edit the following settings: connection, 802-3-ethernet (ethernet), 802-1x, dcb, sriov, ethtool, match, IPv4, IPv6, tc, proxy
nmcli>
nmcli> set IPv4.method manual
nmcli> set IPv4.address 10.16.xxx.yyy/24
nmcli> set IPv4.gateway 10.16.xxx.254
nmcli> set IPv4.dns 10.16.1.115
nmcli> set IPv4.dns 10.16.1.118
nmcli> save
nmcli>quit
Using the nmcli command directly
To change the IP address of the "enp1s0" interface with a direct nmcli command, we run:
$ sudo nmcli connection modify enp1s0 IPv4.address 192.168.122.66/24

 Notice that we specified the routing prefix together with the IP using the so called CIDR notation. We use a similar syntax to change the gateway and the dns settings:

$ sudo nmcli connection modify enp1s0 IPv4.gateway 10.16.xxx.254
$ sudo nmcli connection modify enp1s0 IPv4.dns 10.16.1.115
$ sudo nmcli connection modify enp1s0 IPv4.dns 10.16.1.118
$ sudo nmcli connection modify enp1s0 IPv4.method manual
Solaris
How to stop/disable the autofs on Solaris 9
Autofs is running by default on Solaris 8/9.
If you need to stop it execute the command:
/etc/init.d/autofs stop
If you need to disable then you have to rename the following files :
/etc/rc2.d/S74autofs (check also all the rcX.d)
/etc/auto_master
/etc/auto_home
/etc/initd/autofs
Also edit the /etc/nsswitch.conf and remove "nis" in the clause "automount"
How to disable telnet command on Solaris
Edit /etc/inetd.conf and put a hash(#) in the telnet line. And either reboot the machine or restart inetd:
$ kill -HUP `ps -ef|grep inetd|grep -v grep|awk '{print $2}'`
How to enable remote root logins for telnet command
Edit the file /etc/default/login and comment-out the line
CONSOLE=/dev/console
General
Handling multiple messages in pine.
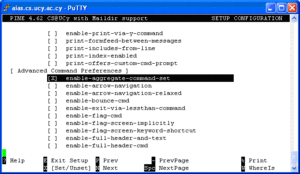
In order to handle multiple messages at once using pine, you first have to enable the aggregate commands: Setup<S> -> Config<C> and check the enable-aggregate-command-set option as shown in Figure 1
.
This option adds: a Select command (;) to select messages by various criteria (From, Subject, Date, etc); a Select Cur (:) to select the current message; an Apply command (A) to apply commands such as Save(S), to save all Selected messages; and Zoom (Z) to restrict the messages shown in the Folder Index to just the selected ones; and Del (D) to delete all Selected messages.
Open the folder you want to handle and click the semicolon (;) Select the messages you want to handle by any criteria that you like, {e.g.: if you want to select a range of message type (N) and then the range (1-1000) and hit enter} then hit (A) and select the command you would like to apply to them{e.g.: (D) To delete the selected messages (X) after (D) will also expunge the messages}.
VPN
vpn client DNS registration
If you are connected to the vpn through a laptop or desktop that does not have as default domain either the cs.ucy.ac.cy or the in.cs.ucy.ac.cy, then you need to tell the DNS to register the connection using the vpn domain. BEFORE CONNECTING
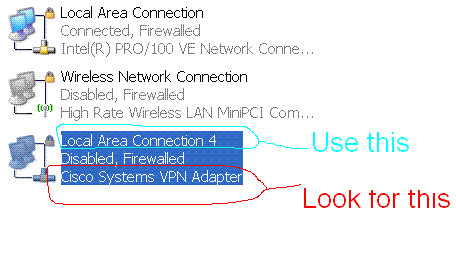
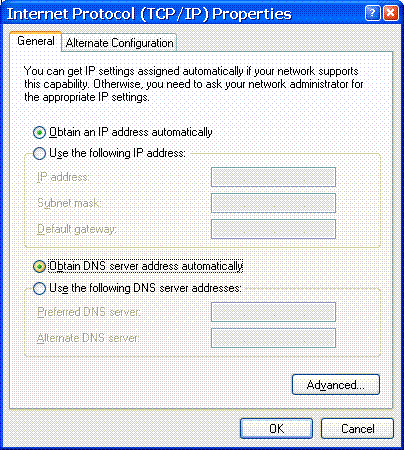
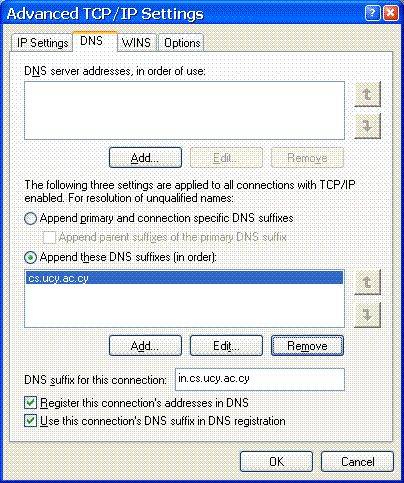
- Right click on the Cisco VPN Adapter (Figure 1 Below ) and then on TCP/IP properties (Figure 2 Below )first select Obtain IP automatically and Obtain DNS automatically. Then under Advanced->DNS
- select Append these DNS suffixes in order
- under that click on Add button and insert cs.ucy.ac.cy in the widow that will appear
- check the Use this connection's DNS suffix in DNS registration box (as shown in Figure 2)
- Check the Register this connection's address in DNS
and then click OK Right click on the connection and click repair or disconnect from the VPN and reconnect. This should fix the problem, and the client will be able to open ssh sessions or other type of connections that demand forward and reverse name resolution.
Alternatively, in case you don't like the mouse clicks, you can use the following command:
netsh interface ip set dns name="<connection name>" source=dhcp register=both
where <connection name> is the name of the VPN connection as seen in the view all connections
window
Headline text
Forwarding to another account
- In your home directory create a .forward file Dont miss the "." at the beggining of the file
- if you want to keep a copy in your cs account enter the line \cs_username, otherusername@other.provider.com
- If you don't want a local copy ignore the first part
Out of the office or going on vacation
- ssh to any Unix/Linux Machine
First create a file called .vacation.msg Note: Don't miss the "." in front of the filename... Its very important!!!
Write your message in the file (an example of what you can put in the file is shown here.
Example
Dear '$FROM'
I will be away from my office until February 30th, 2007.
I will read your message regarding '$SUBJECT' when I return on February 31st.
- Then create a file called .forward
The file should have the following line
\username, "| /usr/bin/vacation -t# username"
where username is your login name and # is the number of days before sending the vacation mesage to the same recipient again.
- Enjoy your vacation
- Once you return back delete the .forward file or move it to a different name to stop sending vacation messages
TomCat
Connecting with mysql DB
Below we explain the procedure for connecting to mysql using tomcat. The procedure was submitted by Electra Tamani
Make sure that you have the appropriate java mysql connector driver in your classpath
String username="dbusername"; String password="your_DB_password"; String url = "jdbc:mysql://dbserver.in.cs.ucy.ac.cy:3306/dbname"; Class.forName ( "com.mysql.jdbc.Driver" ); Connection con = DriverManager.getConnection(url,username,password);
Where: dbusername is the username  that has access to the Database
       your_DB_password is the password for the above user
       dbname  is the name of the database
Typing the euro (€) symbol
- On a windows machine press AtlGr-E together
- On a Macintosh press Alt-shift-2


